
Visas for France
If you’re a member of the European Union, you shouldn’t need a visa for your HexaTrek adventure. So, you can skip this chapter unless you want to delve into unnecessary technical explanations. If you are not a member of the European Union and want to stay in France for more than three months, you will need to obtain a visa. Personally, I’ve found that there are very few resources to help you complete your application. The process is confusing, and you need to allow plenty of time. Above all, don’t apply at the last minute, as this could jeopardise your entire trip. To help you untangle the steps involved in obtaining a visa, you will find in this chapter a detailed description of each step, examples of supporting documents and an explanation of each document requested by the French consulate.
Which Visa Should I Apply For?
Personally, I chose the ‘working holiday’ visa because I was 26 when I crossed France and I was Canadian. It should be noted that this type of visa is only available to young people aged between 18 and 30, and in some countries between 18 and 35. It is also only available for 16 countries and territories. To find out more about the criteria for obtaining this visa, go to: https://france-visas.gouv.fr/en/web/france-visas/young-traveller.Why did I opt for this visa when I had no intention of working in France during my stay? Well, unlike the ‘Long-stay’ visa, which costs around $150 to obtain (in 2024), the ‘working holiday’ visa is free, and you don’t have to plan to work to get it. In fact, I was told that it was possible to apply for this type of visa for holidays only. With this type of visa, you will also be exempt from paying a ‘welcome tax’ (I have hiker friends who had to pay the pretty sum of 200 euros per person when they arrived in France), and, once obtained, you will not have to do any validation procedures when you enter French territory). Here are the steps to follow when applying for a visa, regardless of which one you choose. These are the steps for those types of visas:
- Working Holiday Visa
- Long-Stay Visa
The Main Steps
- Choose your visa type (see above);
- Apply online via the France Visas website;
- Make an appointment at a VFS Global centre;
- Prepare documents and supporting evidence;
- Go to the appointment at the centre and submit your documents;
- Be patient while your application is being processed!
Filling in a Visa Application on the Website France-Visas
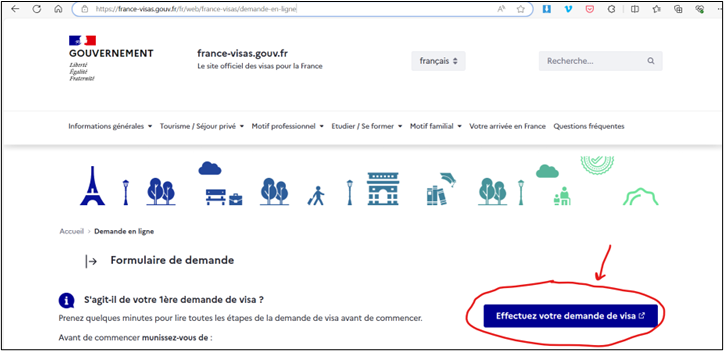
Start by visiting the France-Visas website at the following address : - https://france-visas.gouv.fr/en/web/france-visas/online-application
Click on the ‘Start your visa application’ button. This will redirect you to a login page. If you do not already have an account, you will need to create one . .
Create a new online visa application.
in this section, don’t worry if you make a mistake in your application (for example, a wrong departure date or a mistake in the passport number). Simply create a new one before your appointment with VFS Global, and only your last application will be considered.

Fill in your application online
For the ‘working holiday’ visa,when you are asked to specify the reason for your visa application, select the ‘Other’ option. This will make the ‘working holiday’ option appear in the choices available. .. . .
For the ‘Long-stay visa’ : Choose either ‘Private Establishment’ or ‘Family Establishment’ (the latter option is only available if you have family in France and can provide their address and contact details in the application). You will need to provide an address for the private establishment where you plan to live. Obviously, if you’re going hiking, you won’t be staying in just one accommodation for the duration of your stay. One tip is to book a hotel in France on Booking.com for the night of your arrival. Opt for a modifiable and refundable reservation, which you can cancel once you’ve obtained your visa. This way, you can provide proof of accommodation and avoid spending money unnecessarily. - - - -
Send Your Request Online
Once you have filled in your details, you will be asked to confirm that you have made an appointment in person with VFS before submitting your application online to France Visas. However, when you try to make an appointment with VFS, you will be asked to confirm that you have already submitted your application online. The two steps seem to precede each other… which is impossible. First submit your application online, then make an appointment with VFS.
Once you have submitted your application, make sure you save the document on your computer. In the last few pages of this document, you will find a page with the receipt of visa application, as well as a description of the supporting documents required to submit your application. We will examine each of these documents in detail in the following paragraphs. Bear in mind that some documents may take a long time to obtain, and that it may take a few weeks to put them all together.. . .
Make an Appointment with VFS Global
This section is, by far, the most frustrating because of the malfunctioning of the VFS Global website. The site was very poorly designed, making it time-consuming and energy-consuming to book an appointment. Here are the main steps:
- Go to this site: Login | VFS Global
- You will be asked to create an account. A confirmation will then be sent to you by email.
- Then click on the Start a new booking button Démarrer une nouvelle réservation
You’ll need to fill in the details of the visa application, including which centre you’d like to visit (for Canadians, this will be Montreal, Ottawa, Toronto or Vancouver). Unless you’re very lucky, you’ll probably see a message on the page saying that there are no more places available and you’ll be asked to come back later.
This is where it gets very frustrating, as you can’t get a notification when new slots become available or put your name on a queue. When you call VFS Global directly, they can’t give you an appointment over the phone. They only tell you to go back to the website to book one.
The only free option is, therefore, to return to the website frequently in the hope that a slot will become available. It’s a stressful process, which takes time, unless you’re lucky. I’d advise you to plan as far in advance as possible to avoid the anxiety of the imminent departure. It’s also worth noting that it’s not possible to book an appointment more than three months before your hypothetical departure date.
I don’t know if these schedules will work for you, but personally, I managed both times (yes, I had to go twice; I’ll tell you about it later) to book an appointment in Montreal, by logging on to the site on a Thursday between 1 p.m. and 4 p.m., and refreshing the site every ten minutes during that period.
If you live in Montreal, another option, which is not mentioned anywhere on the website, is to write to the following email address FranceMontreal@vfshelpline.com and ask for an appointment. They’ll be able to help you book a slot, but for a fee of around CAD 90. Note that I haven’t used this option, so I can’t confirm that this process works well, but that’s what the visa centre told me. If you don’t live in Montreal, try to find the email address of the centre you want to go to and give it a try .
Once you’ve found an appointment time slot, select it and enter your personal details. You’ll be in for another surprise when you discover that you have to pay a CAD 38 logistics fee (which is not mentioned before, of course…) Once your online appointment has been confirmed, you can finally take a breather!
Another interesting detail is that in the event of a typing error in the passport number, for example, or errors in your personal details, it is not possible to change them once the appointment has been confirmed. Don’t worry, it’s not a big deal. They won’t turn you away at the entrance to the centre on the day of your appointment. Simply mention the day of your appointment with VFS and they will make the changes for you. Please note that this tip applies ONLY to making an appointment with VFS Global. If you have made a mistake in your online application to France VISA, you will need to send in a new form with the correct information.
Prepare for Your Appointment in Person and Collect Your Supporting Documents
Once your online visa application has been submitted and you have booked an appointment at the visa centre, you need to make sure you have all the supporting documents required for your application ready. Again, this can be a tricky step if you don’t understand the content of some of the documents. Let’s look at each supporting document, for both the working holiday visa and the long-stay visitor visa. In the following paragraphs, the titles of the documents and items to be provided are taken from the France Visas website.
As mentioned above, you will find the list of supporting documents required in the last pages of your visa application document, known as the ‘Récépissé d’enregistrement’.
Generally, you should PRINT all the documents and supporting evidence required. There’s no need to print them in colour; I printed all my documents in black and white and had no problems whatsoever.
AppointmentConfirmation
When you book your appointment with VFS Global, you will receive an appointment confirmation by email. You will need to print this confirmation and have it with you on the day of your appointment.
Documents Required for All Types of Long-Stay Visa
Forms
For both types of visas, you will be asked to have the dated and signed application form and the ‘Récépissé France-Visas’. This is simply the document you filled in on the France Visa’s website. Make sure that all the information is correct.
Passport Photograph
You will need to bring two 35 × 45 mm photos of yourself. When you go to your appointment, it will be possible, for an additional fee, to take your photos on the spot. Note that when I went to the visa centre in Montreal, their photo service was having problems and it was impossible to take them on the spot. I took my photos at a pharmacy and specified the format I wanted. It cost me about CAD 20 for the two photos, with a money-back guarantee if they weren’t accepted for my visa.
Non-Canadian nationals: a permanent resident card (photocopy must be both sides), or a study permit and a valid Canadian visa, or a work permit and a valid Canadian visa, or a Canadian visitor visa (provided the holder can prove three consecutive months’ residence in Canada).
Personally, as a Canadian citizen, I didn’t need to bring any documents to meet this prerequisite.
If you hold an official travel document, you must present a note verbale’
I didn’t understand this request, but I later realised that it didn’t apply to me. This type of document concerns diplomatic passports, service passports, etc. This generally concerns government officials, diplomats, members of international organisations or people with special privileges because of their official status.
A travel document, issued less than 10 years ago, with at least two blank pages, valid for at least 3 months beyond the date on which you intend to leave the Schengen area or, in the case of a long stay, valid for at least three months beyond the date of expiry of the visa applied for. Please ensure that you send (scan) ALL PAGES of your travel document that contain visas, entry and exit stamps or any other inscription.
The famous passport. BE CAREFUL with this document. During my first appointment at the VFS Global centre, I was sent home… because there were two small water spots on my passport! I was extremely surprised because these stains had been there for four years and I had crossed the borders of several countries without any problems. When I mentioned that it had never caused any problems, the agent told me that the French consulate was very strict about the condition of the passport. So, I had to go through the whole process again and get a new passport.
Warning: Don’t forget to SCAN and PRINT all the pages of your passport containing visas, entry and exit stamps or any other inscriptions. To be on the safe side, I have also scanned and printed the main pages of my passport containing my information.
On the day of your appointment, they will take your passport for the entire application process (which takes up to 30 working days). Make sure you don’t need your passport during this time.
Here are a few tips and hints on the explicit documents required, depending on the type of passport you have chosen.
Documents For the ‘Long-Stay’ Visa
Undertaking not to engage in professional activity in France, accompanied, where applicable, by a letter explaining your plans.
If you have chosen this type of visa, it means that you will not have the right to look for work or be employed by an employer on French territory. Note, however, that you do have the right to work remotely if your employer is based in another country. The main thing is not to work under the authority of a French employer.
Here is an example of an engagement letter:
Engagement Letter
I (first name and surname), born on (date of birth) in (place of birth), undertake not to work on French territory for the duration of my stay in France, in accordance with the regulations in force during the period of my trip. I understand that working in France without proper authorisation is illegal and may result in legal sanctions, including fines and expulsion from French territory. I also certify that I will comply with all French laws and regulations during my stay and that I will not make any attempt to circumvent employment restrictions. I am fully aware of the consequences of not complying with this undertaking and I undertake to comply scrupulously with the terms set out above.
Written at (place where you wrote your letter) on (date you signed it) (your signature)
(Date)
(Signature)
Don’t forget to date and sign your letter!
For the covering letter, I added a short note explaining my plans for the HexaTrek, mentioning that I’d be camping for most of it and that I’d be sightseeing in France.
Here is my letter:
The reason for my long stay in France from 25 May 2024 is that I’ll be doing a long trek called the HexaTrek. The HexaTrek is a 3034-kilometre hiking trail starting in Wissembourg, France and finishing in Hendaye, France. The trail is made up of 6 main sections and passes through the following destinations: the Vosges, Doubs, Jura, Savoie, Beaufortain, Vanoise, Écrins, Belledonne, Vercors, Cévennes, Tarn, Languedoc, Corbières, Catalonia, Ariège, Béarn and the Basque Country. I plan to hike this trail for 5 months, taking a few days off to rest in the various villages and towns I come across on the way. I’d also like to visit some of the tourist attractions close to where I’ll be walking. Along the way, I’ll be alternating nights in campsites, hostels and hotels. For my arrival in France, I’ve booked a few nights in Wissembourg, the starting point of my walk. Here’s the route of the walk:
Following this text, I added my route and a photo of it.
Proof of socio-economic situation
Here, to justify your economic situation, we ask you whether you are an employee, retired, a student, on leave, etc. Write a short text about your situation and attach proof (proof of student status, letter from the employer confirming your status, etc.).
Proof
If you choose this type of visa, you will not have the right to work in France. You must therefore prove that you will be able to support yourself for the duration of your stay. For my part, I wrote a letter of my approximate budget for my backpacking trip (I said that the backpacking lifestyle was much cheaper than other types of travel). I also detailed the money I had raised for this trip.
To follow up this letter, I have added several proofs of my financial assets. You need to enclose THE LAST THREE bank statements from your bank account and the last three payslips. I have also enclosed a letter from my employers setting out the amounts that I still have to receive between now and my departure. You can also send your most recent tax return.
Proof of accommodation in France: title deed, lease or any other documentary evidence. Or proof that accommodation will be provided by a person residing in France or, failing that, a document explaining the accommodation conditions in France
Here, I explained that I was going to alternate between bivouacs, camping and refuges that I’d come across along the way. I also said that I had booked a room in a hotel for the first night of my arrival and attached my booking confirmation from Booking.com.
Medical insurance covering the entire duration of the stay. The insurance must be valid for the entire period of validity of the visa (maximum of 1 year)
Another thing that surprised me: you need to have bought travel insurance covering your entire trip before you get your visa. This insurance must include health insurance and international repatriation insurance, so make sure that these two criteria are met. I personally opted for Blue Cross insurance.
That’s it! You now have all the documents you need for your ‘Long-stay’ visa application. Make sure you print them out and have them ready for your appointment at the visa centre. --
Documents for the ‘Working Holiday’ Visa
Now let’s talk about the specific documents for the ‘working holiday’ visa, which differ slightly from the ‘major visitor’ visa application.
Proof of health insurance (hospitalisation, repatriation) for the entire duration of the stay or, for residents of Quebec, the RAMQ affiliation form, as well as repatriation insurance covering the entire stay.
Another document that makes you break out in a cold sweat for Quebec’s hikers… is the famous RAMQ attestation. First, you need to know that this document is obtained after an exchange of letters by post, since the RAMQ does not send forms by email. The RAMQ attestation is simply a letter proving that you are affiliated to the RAMQ. France has an agreement with Quebec, so you can benefit from RAMQ insurance in France too. To obtain this letter, you first need to call the RAMQ and ask them to send you by post the document you need to fill in to obtain the attestation. This document is not available on their website, so you need to send them a request by post or fax. The document will be posted between 5 and 10 working days. Once you have received the document, you need to fill in the information and send it back by post. Take a photo of the document you have signed. If at the time of your appointment you still have not received your proof of affiliation, you can at least show proof that you have taken the necessary steps and that they are under way. Once you’ve sent the document by post, allow around ten working days for the RAMQ to receive your letter and finally send you the official document by post.
A small aside is important here. The process can be extremely long during busy periods. The French consulate is more flexible about this document. At the time of my appointment at the visa centre, I hadn’t yet received my proof of affiliation with the RAMQ. They simply told me to email them my proof once I had it. However, at my appointment, I still gave them my proof of Blue Cross travel insurance to prove that I was insured for my entire trip. In the end, the funny thing is that my visa application was approved before I received my proof of membership! So don’t worry if you haven’t received your proof yet and go to your appointment anyway.
Medical certificate stating that the visa applicant’s state of health allows him/her to work (if provided for in the bilateral agreement).
Even though this document is required, it apparently didn’t apply to me. It must depend on which country you come from. So, I didn’t provide anything for this part.
Proof of a clean criminal record (if provided for in the bilateral agreement).
Once again, I didn’t have to provide anything for this section. Once again, it depends on the country of origin and the bilateral agreements.
Letter of motivation and proof of return or undertaking to leave France at the end of the stay’
This involves writing a letter to say that you do not intend to stay in France after your stay. Here’s my letter:
Objet : Engagement de retour au Québec après séjour en France
I am writing to confirm my commitment to return to Quebec after my stay in France, which will begin on (add date) and end on (add date). My trip to France is specifically planned for my hiking project, and I have no intention of settling in or extending my stay beyond the period mentioned. I undertake to comply with all legal and administrative requirements concerning my stay in France, including visa and residence formalities, where applicable. In addition, I will ensure that I maintain my social, professional and family ties in Quebec during my absence, and I will be ready to resume my activities as soon as I return. I remain at your disposal for any additional information or documents you may require confirming my commitment.
Yours sincerely
(add your name, date and place of signature and your signature)
Proof of income of at least €2,500 (e.g. latest bank statement).
This involves proving that you have a minimum number of financial resources to support yourself in France. A bank statement is sufficient, but as a precaution, I have attached an explanation of my budget and my last three bank statements.
During and After the Appointment
Appointment Day
On the day of your appointment, make sure you have all the required supporting documents printed out, the printed appointment confirmation and a card validating your identity. You are not allowed to bring the following items to the centre: battery-powered or electronic gadgets (cameras, laptops, USB sticks), large bags (travel bags, suitcases) and flammable, sharp, firearm-type items and explosives of any kind. Please note that there is no place in the centre for depositing prohibited items. So be careful not to bring any of these items.
When you enter the centre, you will be asked for your identity card and confirmation of your appointment. You will be taken through a metal detector (it feels like an airport), and then you will have to wait in the waiting room.
You will then go to an agent who will ask you one by one for each document required and will confirm your information with you. Then, if everything is in order, your biometric fingerprints will be taken (service included in the fee).
Tips: Once these steps have been completed, you will be charged a $50 fee to receive your passport in the post once your visa application has been processed. You have the right to ask to collect your visa from the visa centre free of charge (an option they will not mention to you).
After the Appointment
All you have to do is wait for your request to be processed. Please note that processing can take up to 30 working days. I was pleasantly surprised that my application was processed in five working days! Once your application has been processed, you’ll receive an email telling you to come and collect your passport (obviously to add to the suspense, the email doesn’t tell you whether your application has been accepted or refused). You’ll be surprised to find out when you go to the visa centre. If you have chosen the postal service, you will receive your passport and your reply by post.
Good luck !